Over the course of the last year, we have seen several changes when it comes to our privacy online including how we view this data and how it can be used to remarket to users. Adding Covid-19 to the mix, we as marketers have had no choice but to change our thinking and the way we implement our paid media and PPC agency strategies.
As if all these tweaks weren’t enough, Google kindly threw GA4 into the mix… something that is very different to what we have seen before. One of the most challenging aspects of GA4 is tracking. Whilst there is hope in the marketing community that Google will make GA4 more user-friendly when it exits Beta mode, we need to find a more convenient way to implement eCommerce tracking in the meantime. If you are someone who uses plug-ins, I have good news for you! Many plug-ins have created JSON files to make implementing said tracking far, far easier!
When it comes to setting up tracking on Universal Analytics, Google has a handy little check box on the Google Analytics settings or the tag that says “I would like you to read the information from our data layer” as set out below:
![]()
Or:
![]()
Unfortunately, GA4 does not have these check boxes. But what does this mean?
As we know the data Layer holds all the information on the website; Transaction ID, number of purchases, total purchase value. This information is pulled into tag manager who then pushes that information into which ever data base we are using, i.e. Google Analytics, Google Ads and Facebook.
The enable enhanced eCommerce features check boxes provides Google Tag Manager permission to grab these values manually, this means that eCommerce tracking can be set up by anyone and no coding knowledge is needed.
Sounds easy right? It was until GA4 came along!
When it comes to GA4, you need be able to pull information manually from the data Layer which will need some basic knowledge of coding. The following image showcases what a Data Layer will look like:
In Tag Manager, you need to raise a data Layer variable and write the Data Layer variable exactly how the information is in the data layer.
For example, if you wanted to pull the information from this Data Layer information you would need to create a data layer variable to pull item data. The Data Layer variable needs to encapsulate the following:

Next, under the GA4 tag you need to add an event parameter and data Layer variable for each bit of information you need i.e., Item ID, purchase value, transaction ID.
To make the situation more complicated, website developers and various plug-ins often have their way to write a code. This means that there is no one-size-fits-all code, and you will need to carry out a ‘test transaction’ before tracking can begin just to read the code. You must then write the code and carry out a further test transaction to ensure the code works correctly. If not, you may need to update the code and complete the above process again. Sound exhausting, right?!
The good news is a lot of plug-ins have seen this as an issue and come up with a resolution. Some plug-ins will automatically track these events for you such as Pixel Your Site. Other plugins such as WordPress for Tag Manager have created JSON files.
In this scenario, I’m going to use WordPress for Tag Manager as it’s the one that I have successfully tested and found works well.
A JSON file is a container where the plug-in writes the code for you in a JSON file based on how they write the Data Layers. All you need to do is change the information in the JSON file based on your Tag Manager information, upload it into Google Tag Manager and Voila – your tracking is all set up ready for you to test!
The instructions are below:
Plug-ins will either provide you the JSON file on their website or through the plug-in settings. For WordPress (Tag Manager), you can find this on the website under step one called ‘GA4 container template’.
Once downloaded, you can open this on note pad. The file itself is pretty big, so I have not included the full file in this blog but an example snippet instead:
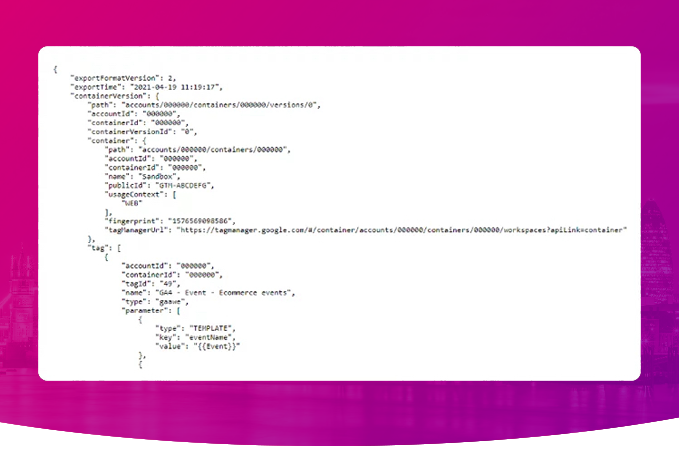
What you need to do is replace all the 00000’s with the IDs in Tag Manager. As this information runs all the way through the file, it’s likely to be more efficient to use the find function in notepad.
Once the relevant information has been changed, go to Tag Manager, and select the admin column. Under the container section you will see a section called import container:
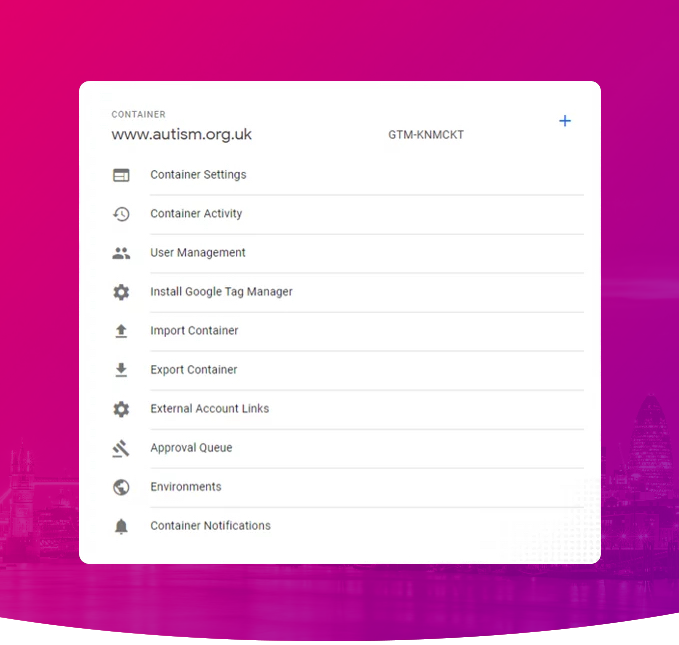
Simply select the choose container file and upload. You have the option of uploading into the existing workspace or a new one.
Once the file has been uploaded, you can check all the tags have been added correctly with the right information. If everything is good to go, publish your changes and test that the new tags are working correctly. It really is as easy as 1, 2, 3!
Unless you have extensive code knowledge or a website department with unlimited resources, I strongly recommend using plugins and JSON files. As someone who put a lot of time and energy into working out how to set up eCommerce tracking, this is a massive time saver! If you are currently using a plug-in, check to see what they offer. Some plug ins may incur a fee whilst others are free – be sure to shop around to find the best one for you. Just be aware that, should you update a plug, your tracking may experience some temporary disruption.
For more information, get in touch with digital marketing agency Absolute Digital Media’s expert paid media/PPC team on 0800 088 6000 today.